
Spring is just around the corner with all the hope and promise that holds for our bees. So it’s worth taking time to plan our first hive inspections. The changeable British weather at this time of year means we need flexibility to practice our beekeeping activities as the weather allows.

By early March, most healthy colonies should be expanding with an increasing amount of brood being raised. The sight of workers returning to the hive with heavy loads of pollen is a good indicator of this, but be aware, brood rearing puts a heavy demand on the colony’s food reserves so starvation is still a very real possibility; keep an eye on stores and the weather.
If your bees still have honey in the brood box, move these frames so that they are positioned next to the brood nest. If stores are light but the weather is good, you can feed an intermediate strength syrup (1 litre of water to 1kg of white granulated sugar, an easy one to remember and do) If the weather is poor, continue to feed fondant. Beebase, feeding
There is nothing more depressing for a beekeeper than to open a hive to find dead workers with their heads deep in the cells, trying to access the last of the stores as they starve, especially if there are stores in another part of the hive. This is called ‘isolation starvation’ and happens because it’s been too cold for the bees to move from one part of the hive to another. Continue to heft hives through March and if they feel light, feed as necessary.
A quick inspection
If it’s not warm enough to wear a tee-shirt (temperature below 14c), it’s still not warm enough to open the brood nest, but you can do a quick inspection. Carefully remove the roof (it’s likely to be stuck with propolis) so as not to make too much noise and disturb your bees.
Peer through the holes in the crown board. Note the smell; if it’s yeasty or musty and there’s no apparent movement inside, check whether the colony has died. If it has, close the entrance to prevent robbing which can spread disease. You can examine it later in an attempt to establish the cause of death.
There may be days in March when the Sun is shining and the temperature is above 14c. On such occasions you can carry out a full inspection. The spring inspection is the most important of the year as it is the first opportunity to assess the health of your colony.
The full spring inspection
Plan
Before you start, think what it is you’re looking for and more importantly, what action you’ll take if you find it. Record your observations so you’re properly prepared for the next time you open the hive. If you’re planning to replace any equipment (for example the hive floor), take the equipment with you. Remember, you’re also going to need a queen excluder.
Check the entrance
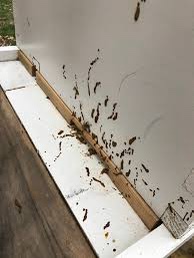
Before smoking the hive entrance, look carefully for signs of bee excreta in the form of brown stains which could be a sign of disease. Are there bees crawling aimlessly in front of the hive? Both these symptoms could indicate disease. You can always ask at Meridian if you would welcome guidance.
Clean floor
Once you have completed your check, lightly smoke the entrance and wait a minute. Carefully remove the hive roof and place it upside down on the ground nearby. If you are providing a clean floor, gently separate the existing floor from the brood box with your hive tool. Carefully lift the brood box from the floor and place it diagonally on the upturned roof. You can then replace the floor or scrape the existing one. Make sure any scrapings go into a container and not onto the ground near the hive as this can spread diseases.
Look for the queen
Once the brood box has be replaced on the clean floor, gently smoke across the crown board before carefully prising it off. Check the underside in case the queen is there. If she is, carefully place her between the frames in the brood box. If the queen is not present but the crown board has other bees on it, it can be propped against the landing board in front of the hive entrance.
There’s a good chance your hive will have a super on it (you probably left a super of honey on as winter stores without a queen excluder), so if you find the queen on the crown board or in the super, make sure she’s carefully transferred to the brood box.
Checking the combs
Remove the brood comb from the outside edge of the hive nearest to you. Shake any bees into the brood box and inspect both sides of the frame. When you have finished, set the frame against the side of the hive or place it on a frame hanger if you have one. Repeat the exercise for the second frame so as to make plenty of space in the brood box for you to work.

When inspecting frames, always do so over the hive in case the queen is dislodged. In that way, she’ll fall back into the brood box and won’t be lost in the grass. As you remove and replace the frames, take care not to roll or crush your bees.
What to look for?
Record the total number of frames your bees are occupying and the number of frame which have brood. Remember, Nosema can cause ‘spring dwindling’ so your notes will help you keep track of that.
If you haven’t already seen the queen and/or brood at all stages, check your colony is ‘queenright’. The term queenright means the queen is present, laying eggs and producing worker brood. If you find significant areas of ‘bullet’ like cappings (see photos), it’s likely the queen has become a drone layer.
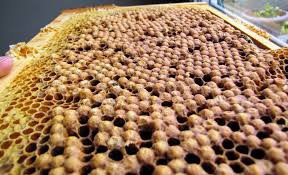

Keep an eye on it by inspecting again the following week. If the proportion of drone brood has increased, it’s almost certainly a drone laying queen. The best you can do is to find and kill her, then unite the colony with a healthy one using the newspaper method.
Laying workers

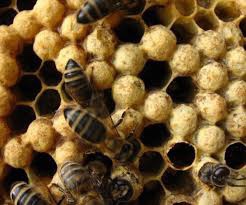
If the colony is hopelessly queenless (without a queen for sometime and without the means to raise one) workers may begin to lay. In this case, the patches of bullet-like cappings will be small and irregularly spaced. Look carefully into upcapped cells, you may see cells containing more than one egg or eggs stuck to the sides of cells or scattered across the top of the comb.
The only action you can take in the case of laying workers (assuming the colony is otherwise healthy) is to take the brood box about 200 metres away from the apiary and shake the bees onto the ground. Do not replace the brood box (or any supers) in its original position. The bees will find their way back to healthy colonies.
Test comb
Sometimes you’ll come across an apparently strong and health colony that doesn’t appear to have a queen or brood. In this case, you can test for the presence of a queen by inserting a brood frame containing eggs from another colony. Check the colony again in ten days. If the bees do not raise queen cells, you know the colony is queenright.
If queen cells are raised, the colony must be united with a healthy one using the newspaper method. This is because, in early spring, there will be no drones available to mate with the queens contained within the queen cells.
Check the brood is healthy
Once you’ve found your queen, you can check the brood is healthy by shaking off the bees from each frame in turn and examining them carefully.

Healthy brood is pearly-white. The segments of the bodies should be clearly visible and each larvae lies at the bottom of the cell in a ‘C’ shape. Cells containing eggs should contain only a single egg, standing on its end if it has just been laid or lying flat at the bottom of the cell if it’s two or three days old.

Cappings on capped brood should have a dry appearance and be the colour of a digestive biscuit. Sometimes, the cappings can be a bit darker especially on older comb.
Any deviations from these standards could indicate unhealthy brood, particularly if the larvae looks distorted or discoloured or the cappings have a moist, greasy appearance. If you see such signs, take photos if you can and ask Meridian for help and advice.
Check there is sufficient food
As you go through the frames, make a mental note of the stores you see. A standard national brood frame holds 2.27kg (5lbs) of stores. If your assessment is that stores occupy less than the equivalent of two full brood frames, feed your bees, ideally with a contact feeder. The syrup should be made at a concentration of 1kg white granulated sugar to 1 litre of water.

The reason a contact feeder is recommended at this time of year, is that the bees are able to reach it without moving far from the winter cluster.
Check the condition of brood combs
The spring inspection is the ideal time to plan what you’ll need to do in terms of comb change. It’s recommended that no comb is more than three years old as dirty comb can accumulate diseases. Regular comb change also helps manage varroa.
During the spring inspection, sub-standard comb can be moved to the edges of the brood box for subsequent removal. It can be replaced with drawn comb or foundation. As you move comb around the hive, care should be taken not to split the brood nest.
As you inspect, assess the overall state of the comb and plan if you think it will be necessary to replace all the comb using either the Bailey or Shook swarm methods.
Having completed your spring inspection, reassemble the hive as quickly and gently as possible. Remember, to install a queen excluder between the brood box and any supers, having checked the queen is safely in the brood box. The first inspection is also a good time to start sugar dusting your bees. Sugar dusting.
Having completed your spring inspection(s), get your supers and frames ready for use. It’s good practise to have at least one super (preferably with drawn comb) over a queen excluder on each colony by mid-March. Even a short spell of good weather could result in a spring nectar flow and as the colony population increases, the bees will utilise the super for stores.
